Salmon Cakes
Tag: dinner
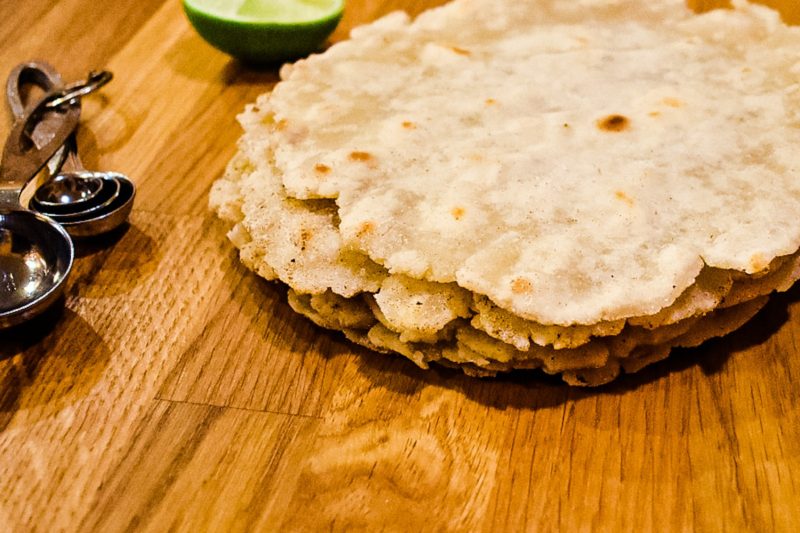
Gluten Free Flour Tortillas

Ingredients
- 2 cups gluten free flour (I used Josie’s Best)
- 1 tsp salt
- 3 tbs oil (I recommend coconut oil, canola oil, or olive oil)
- 1 cup water
Buffalo Chicken Nachos
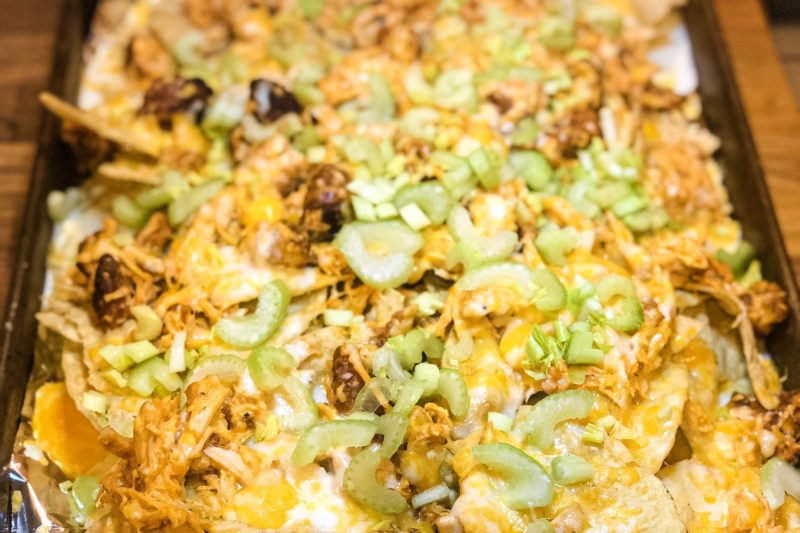

Ingredients:
- 2 chicken breasts, cooked and shredded
- 1/2 cup Frank’s Wing Sauce
- 1/2 cup gluten free ranch dressing
- 1 8oz block of Monterey Jack cheese, shred it yourself
- 1 8oz block of Colby Jack cheese, shred it yourself
- 3/4 cup heavy cream
- 2 sticks celery, chopped
- 1 bag of gluten free tortilla chips
One Skillet Sausage and Rice
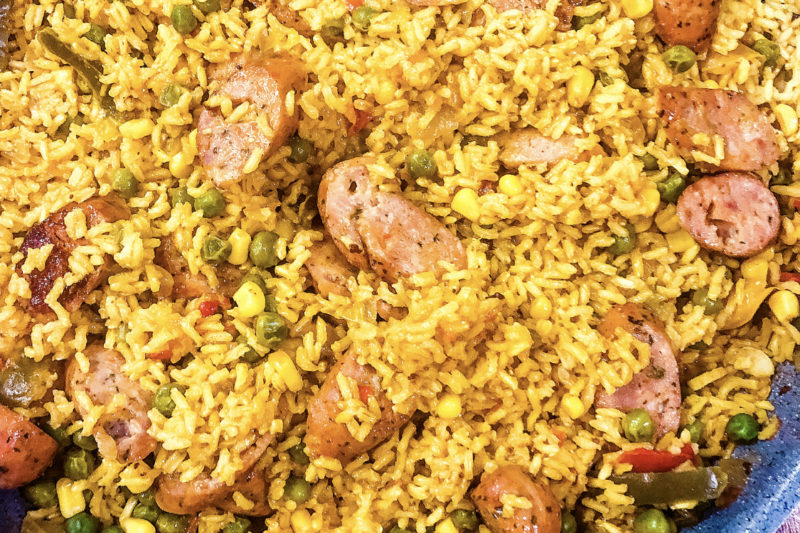
One Skillet Sausage and Rice
Serves 4

Ingredients:
- One package chicken sausage sliced (Andouille is best). I got mine from Aldi!
- 2 tbs tomato paste
- 2 cups brown or white rice
- 1 carton chicken broth or stock
- 1/2 cup frozen peas
- 1/2 cup frozen mixed peppers (fresh are fine too!)
- 1 onion (diced)
- 1/3 cup frozen corn
- 1 tsp cumin
- 1 tbs Old Bay seasoning
- 1 tsp tumeric (optional: for color)
- 1 tsp salt (more to taste)
- 2 cloves garlic, minced
- Oil for skillet (any oil works!)
Philly Cheesesteak
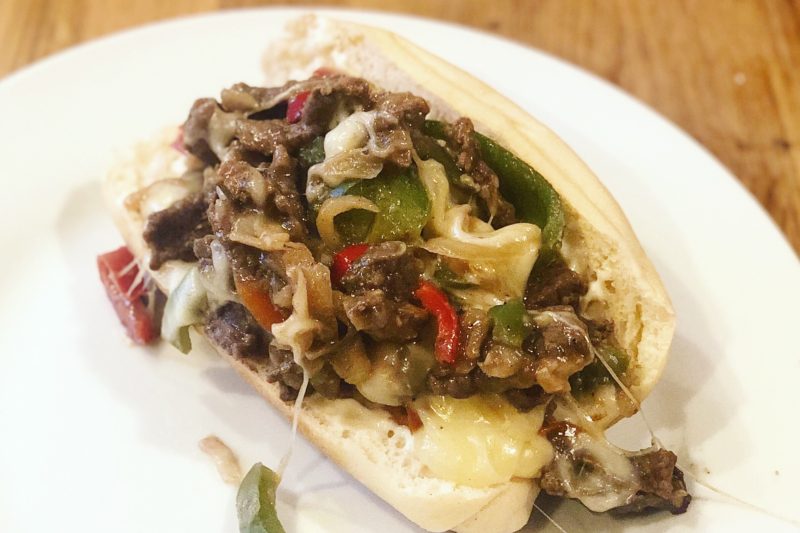

Serves 2.
Ingredients:
- 1/2 pound beef sirloin (pre-sliced or you can slice it yourself. It’s easier to slice a steak if it’s still cold!)
- 1 cup frozen peppers and onions
- 4 slices provolone cheese
- 1/2 tsp salt
- 1 tsp garlic powder
- 1/2 tsp onion powder
- 1 tsp cornstarch
- Tbs oil for pan (I used olive)
- Gluten free sandwich roll (I used Scharr but any roll will work!)
- Mayonnaise
Deep Dish Pizza
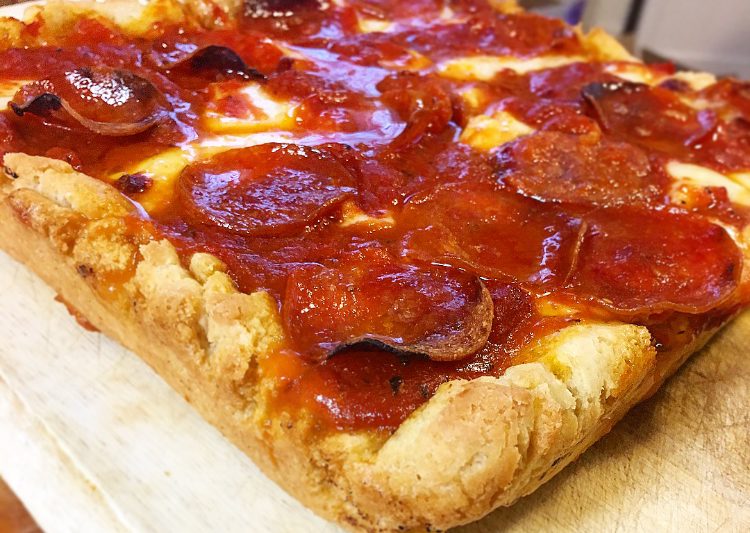
Since being diagnosed, deep dish pizza was really the only thing on my Celiac bucket list that I just couldn’t seem to find. Understandably I guess, since gluten is pretty key in that whole thick crust thing. But being raised in the Midwest, I was dying for some deep dish. I grew up on that delicious, caramelized crust that was every bit as tasty as the sauce and cheese and New England pizza just wasn’t doing it for me. All you can get around here is super thin crust that, to me, tastes like cardboard. Even before being diagnosed, I just wasn’t a fan of any of it. My husband is from the New Haven area, which is famous for it’s thin crust pizza, so we’ve had many debates about which crust is best! I just can’t understand why you’d want your crust to taste like cardboard when you could have it taste good…? Haha You can take the girl out of the Midwest, but not the Midwest out of the girl I guess.
Anyways, it was always on my to-do list to just go ahead and try to make it. As they say, if you want something done right, you gotta do it yourself. Well, as fate would have it, I was watching my favorite Food Network show–The Kitchen–and Jeff Mauro made a Detroit-Style pan pizza. I watched him make it and honestly it didn’t look too hard! I figured I’d just go ahead and give it a try. Some important things I learned from my experiment:
- I don’t know if it’s the gluten free flour or what, but my food processor could NOT handle making this dough. On the show, he just threw everything into the food processor, pressed pulse, and it formed into a little ball. Wanna know what mine did? It started smoking lol And it was the same type of food processor too! So now when I make the dough, I just make it in a bowl.
- You need a little bit more flour than his recipe calls for.
- Your dough isn’t going to rise as much as his does, but it’s all good.
So after living and learning, here is how I make it! I start by getting 3 cups of gluten-free all purpose flour into a bowl. Then I add in 2 tsp salt, 1 tsp sugar, and 1 tsp dry active yeast. Yeast is one of those things that I think people are sometimes confused about. As long as it’s not brewer’s yeast, it’s usually gluten free! The little packet I bought said “contains no wheat or gluten” right on it just to reassure people.
Mix up all your dry ingredients until they’re combined and then slowly add in 1 cup of warm water. At that point, I just put some olive oil on my hands and get in there. I mix it all by hand and then start kneading it. Keep folding and kneading it for about 10 minutes. I find this incredibly relaxing lol But I also love all things sensory–play dough, slime, etc. Once it’s nice and kneaded, plop it into an oiled bowl and put some plastic wrap over it. Find a spot in your kitchen that’s kind of warm and leave it there for a couple of hours. It should rise a little bit, but don’t expect anything crazy. Jeff’s doubled in size, but that’s just not gonna happen for us.

After a few hours, you should be good to go. Now it’s time to get it in the pan. The key to that caramelized crust is to cook the pizza on HIGH heat with LOTS of olive oil so it essentially fries. So preheat your oven to 500 degrees and drizzle a healthy amount of olive oil in an 8×8 pan.
 Make sure you spread the oil up onto the sides too. You want the sides of the crust to fry and get all crispy/caramelized as well!
Then you’re just going to press your dough into the pan. Spread it out evenly. I’ve done it where you make the middle thinner and do a more defined crust and also where the whole thing is the same thickness…both work just fine! So it’s really up to you.

I used quite a bit of olive oil so it kind of overflowed into the dough. Try not to let that happen haha But it’s not the end of the world if it does. Next, you’re going to add a layer of pepperoni and diced mozzarella cheese. That’s right, I said diced! The Detroit-style uses cubes of mozzarella cheese, but really whatever you want to do is fine. I’m sure shredded would be great as well!

At this point, you’re going to drizzle a few lines of pizza sauce. I just use jarred pizza sauce–typically the Classico kind. And then you can top the sauce with a little more pepperoni if you’d like….I say the more the better.


Now you’re just going to put it in the oven on the bottom rack for 10-20 minutes. It honestly depends on your oven. My pizza is usually perfect between 15-20 minutes, but your oven might work harder than mine, so just check on it!


Not too shabby, eh?? I was super satisfied and my husband couldn’t stop raving about it!! He’s asked me to make it several times again already! WIN.
Ingredients:
- Pizza Dough
- 3 cups all purpose gluten free flour
- 2 tsp salt
- 1 tsp sugar
- 1 tsp dry active yeast
- 1 cup warm water
- Toppings
- Jarred pizza sauce (about a cup, depending on your preference)
- Block of mozzarella cheese (you’ll use about 1/2 an 8oz block)
- Pepperoni (I use Hormel or Applegate)
- 3 tablespoons olive oil
Instructions
- Add flour, salt, sugar, and yeast to a bowl. Mix together.
- Pour in warm water. Put some olive oil on your hands and then begin to mix the dough together until it’s all incorporated and cohesive.
- Knead the dough for about 10 minutes.
- Place ball of dough in a bowl, cover with plastic wrap, and let sit in a warm spot in your kitchen for about 2 hours.
- Preheat oven to 500 degrees.
- Add olive oil to a metal 8×8 pan and then press dough into it, spreading evenly.
- Top with a layer of pepperoni.
- Add cubed pieces of mozzarella (about 1/2 inch cubes)
- Drizzle pizza sauce in lines down the pizza. 3-4 lines is usually good.
- Top with another layer of pepperoni (optional)
- Place on bottom rack in oven and bake for 10-20 minutes or until edges are brown and cheese is melted.
- Let cool and enjoy!!

Lasagna Soup
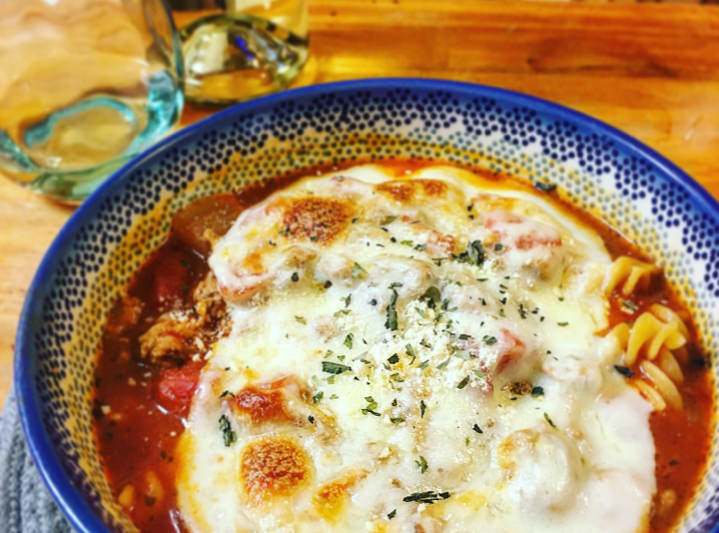
If you follow me on instagram, you probably know that I absolutely love the show The Kitchen on the Food Network. I watch it every weekend and I get so many good ideas from it! A couple weeks ago, Katie Lee made a lasagna soup and I had just happened to thaw out some ground turkey that I didn’t know what to do with…it was perfect. And I had all the other ingredients already on hand! How often does that happen?!
In her recipe, she cooks hers in the slow cooker and uses lasagna noodles. This was a last minute thought for me, so I made mine in my dutch oven pot! You could also totally use GF lasagna noodles to really give it that feel, but I didn’t have any on hand and I didn’t think it made much of a difference.

These are ingredients I pretty much always have in stock: chicken broth, canned tomato sauce, canned diced tomatoes, and gluten free pasta! You can make so many different things with them and they’re easy to buy in bulk! I’ve started buying from Brandless and it’s saved me a lot of money! I can get cans of organic tomato sauce for $3! Plus they have 3 cartons of veggie broth for $3 as well! Everything on their site is $3 and mostly organic. So fabulous.
So I started this recipe off by browning my ground turkey in my dutch oven pot with a little bit of olive oil. Once it was brown, I poured in my diced tomatoes, tomato sauce, a chopped onion, and the whole carton of chicken broth. I added a little water as well just so it had some extra liquid. I added in a few sprinkles of salt/pepper, parsley, basil, oregano, and red pepper flakes. Then I got it simmering and let it cook, covered for about 10 minutes.
After 10 minutes I add ed in my pasta and let it cook, covered, until the pasta was tender. At this point it was looking good and you could totally just eat it as is! That’s actually how my husband ate it, because he doesn’t like melted cheese. I KNOW. What a weirdo, right? lol I’m obsessed with melted cheese and I knew it’d really amp up that “lasagna” feel, so I went for it.
I dished my soup into an oven-safe, Polish pottery bowl and then put two slices of provolone cheese on top. I just LOVE the taste and cheese-pulliness of it (that’s not a word and I’m not a chef lol). I put my toaster oven on broil and put my bowl in for about 5 minutes or until the cheese was golden brown and bubbly. (I decided to use my toaster oven rather than my regular oven to save some energy!)
It came out lookin’ gorgeous. I topped it with a little GoVeggie Parmesan cheese and some more dried basil and it was ready to go!

I loved it SO much and will definitely be making this again and again. It’s such a warm and comforting meal for the winter and it’s really so easy! If I had gone to the grocery store before making this, I probably would have gotten fresh basil and some mozzarella cheese to add as well.
Recipe
Serves 4
- 1 lb ground turkey
- 1 carton GF chicken broth
- 1 box gluten free pasta (lasagna noodles or any other shape)
- 2 cups water
- 2 tbs olive oil
- 1 can tomato sauce
- 1 can diced tomatoes, not drained
- 1 onion, chopped
- 1 tbs basil
- 1/2 tbs oregano
- 1 tbs parsley
- 1 tsp red pepper flakes (more or less depending on how spicy you like)
- Salt and pepper to taste
- Provolone cheese (2 slices per bowl)
- Shredded mozzarella (optional)
- Parmesan cheese to sprinkle on top at the end (optional)
Instructions:
- Brown ground turkey in dutch oven pot with olive oil and chopped onion over medium heat.
- Once it’s browned, add tomato sauce, diced tomatoes, chicken broth, and water (if you want it thicker and less soupy, leave the water out). Stir.
- Add in basil, oregano, parsley, and red pepper flakes. Salt and pepper to taste.
- Bring to a simmer, cover, and cook for 10 minutes at a low simmer.
- Add in box of gluten free pasta and simmer, covered, until pasta is tender.
- Dish soup into oven-safe bowls and top each bowl with 2 slices provolone cheese. If you have mozzarella cheese, sprinkle a bit of that on top too.
- Put oven or toaster oven on broil and put bowls in for about 5 minutes or until the cheese is bubbly and browned.
- Sprinkle a little Parmesan cheese and basil on top, let cool for a few minutes, and enjoy!
Taco Mac and Cheese
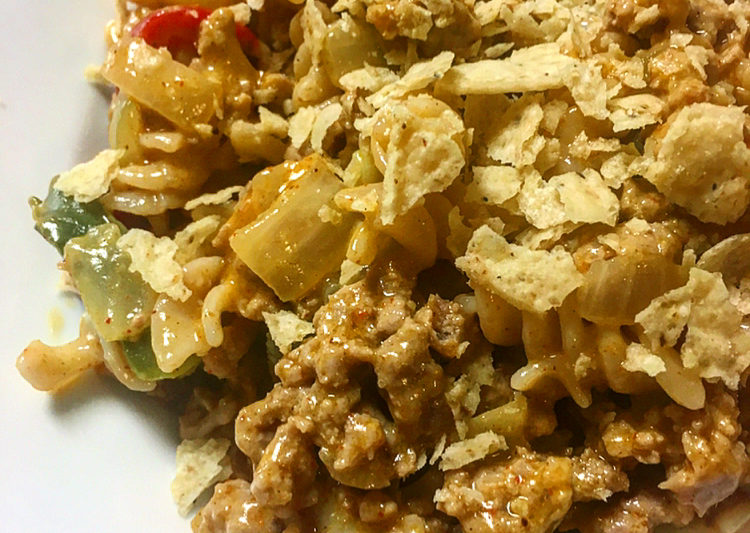
Two of my absolute favorite meals are tacos and macaroni and cheese. If you’ve read my other posts, ya’ll know that I served mac and cheese at my wedding lol And if I wasn’t afraid that tacos would ruin my wedding dress, I would have served those too! Both foods are just so comforting and delicious.
I also find that when I’m in a rut of what to make for dinner and I’m not feeling like I’m in the “mood” for anything, tacos always sound like the perfect thing! And I mean, mac and cheese is something I’m always in the mood for lol I’ve tested various versions of mac and cheese (buffalo mac, Alfredo mac, etc) and I’ve made taco mac and cheese in the past before…but recently I decided to try it again and it dawned on me to switch up how I made it. Let me tell you, this small tweak made ALL THE DIFFERENCE. Holy cow. My husband and I couldn’t get enough of it.
So the first few times I tried making it, I would just add taco seasoning to my ground turkey as I was cooking it. That’s how I made tacos so I figured that made the most sense! Then I’d just make mac and cheese as normal and mix in the taco-flavored meat. WELL, one day as I was about to do this, a light bulb went on…I thought, “Instead of adding it to the turkey…why wouldn’t you just add it to the cheese sauce?” BINGO. The taco flavored meat added a nice kick to mac and cheese, but when you add the taco seasoning to the sauce, it really gets that taco flavoring throughout the whole dish! It gives the sauce a lovely color and kicks it up about a million notches. Who knew?? (Probably someone…lol just not me).
So to get this miracle started, boil your noodles according to package directions and drain. While I’m boiling my noodles, I also heat a skillet over medium heat with a little coconut oil and brown my ground turkey. As it’s browning, I add a tsp of salt and a tsp of pepper. I will also add in half a diced onion as well. Cook it, stirring occasionally, for about 5-7 minutes or until the turkey is brown and the onions are just about translucent. At this point, I add in 1/2 bag of frozen mixed peppers and 1/2 a bag of frozen corn. I mix it up and then put the top on the skillet to let it all steam and cook through.
With the noodles in the drainer, I use the pot I cooked them in to make my cheese sauce. It’s usually still warm AND you save some dishes. Win. So I put that pot back on the stove, but this time on low-medium heat. To the pot, I add 1.5 tbs of Earth Balance butter. You could use regular butter as well, I just like to cut down on dairy a bit. Once the butter melts, add in about 2 tbs of gluten free flour and whisk it around. It should make a roux–a kind of thick glue-like mixture that has a dark golden color. That’s what makes your mac and cheese thicken up!

I typically use Bob’s Red Mill all purpose flour. But whatever you have on hand works! Cornstarch works as well. Once your flour and butter are fully mixed and have formed your roux, add in 3/4 cup milk. I use almond milk (again to cut down on dairy and calories).

Whisk the milk into your roux and then slowly start to add your cheese. I use about 1/2 cup of white cheddar and 1/2 cup sharp yellow cheddar. Whisk while you add and wait for it to melt in before you add more! Feel free to tweak your sauce if it’s too thick or not thick enough. Everyone has their own preference! Once all my cheese is melted and mixed in, I add a packet of McCormick’s Gluten Free taco seasoning and mix it all up. McCormick is really great about calling out allergens in their ingredients!! They do make a taco seasoning that’s labeled gluten free, but if your store doesn’t have that, you can just get their original taco seasoning! It’s gluten free as well. Just check the back. Wheat, barley, or rye will be in bold black!
I add my noodles back into my cheese sauce, mix, and then add in my ground turkey and veggie mixture! Top with some crushed, gluten free tortilla chips and you’re all done! Enjoy!

Recipe
- 1 package gluten free pasta (I like Tinkyada brown rice pasta)
- 1 lb ground turkey
- 1/2 bag of frozen, mixed bell peppers
- 1/2 bag of frozen corn
- 1/2 a white onion, diced
- 1 tbs canola or coconut oil
- 1 tsp salt and pepper
- 1/4 cup crushed gluten free tortilla chips (I used Tostitos)
For the sauce
- 1/2 cup white cheddar shredded cheese
- 1/2 cup yellow sharp cheddar shredded cheese
- 3/4 cup almond milk (or your choice of milk)
- 1.5 tbs Earth Balance butter (or your choice of butter)
- 2 tbs gluten free flour or corn starch
- 1 packet Gluten Free McCormick’s taco seasoning
Instructions
- Boil your package of gluten free noodles according to package directions. Drain and set aside.
- Heat a skillet over medium heat and add your oil. Add in diced onion and ground turkey. Season with salt and pepper and brown.
- Once the meat is browned, add in 1/2 bag of peppers and 1/2 bag of corn. Mix and put top on skillet.
- Put empty pasta pot on low-medium heat. Add in Earth Balance and let it melt. Once it’s melted, add in flour and whisk together until roux is formed.
- Slowly pour milk into roux while whisking.
- Once roux and milk are fully mixed, slowly add in your cheese, mixing as you add. Make sure it melts before you add more!
- If the sauce is too thin for your liking, add more cheese. If it’s too thick, add more milk.
- Once the sauce is mixed, dump in your taco seasoning packet and mix thoroughly.
- Pour pasta back into pot and mix into cheese.
- Mix in turkey and veggies.
- Top with crumbled gluten free tortilla chips and serve!

Crazy Easy Mac and Cheese

So the other day at the grocery store, they had pork shoulders buy one get one free. Great deal! So on Monday morning, I put my pork in the slow cooker with plans to have pulled pork for dinner. Usually while I’m at work, I’ll brainstorm some ideas for what else I’m going to have with whatever meat I thawed out…but on this day I was stumped. We had just had mashed potatoes for dinner the night before and I didn’t want to do potatoes two days in a row….and rice didn’t seem like a good choice. Then suddenly it hit me, MAC AND CHEESE. We had pulled pork and mac and cheese at our wedding, so clearly it’s a household favorite haha
Normally I like to make mac and cheese and then bake it to get it crispy, but I wasn’t going to get home until kinda late and I wanted something that would come together fast! I kinda just threw this mac and cheese together (in 15 minutes, no lie) and it turned out SO GOOD. So I’ll let you guys in on the recipe…really nothing fancy. Just simple, easy, and DELICIOUS. I used earth balance vegan butter and almond milk to cut down on the dairy, but you could totally use any kind of butter or milk that you’d like!
Chicken and Dumplings
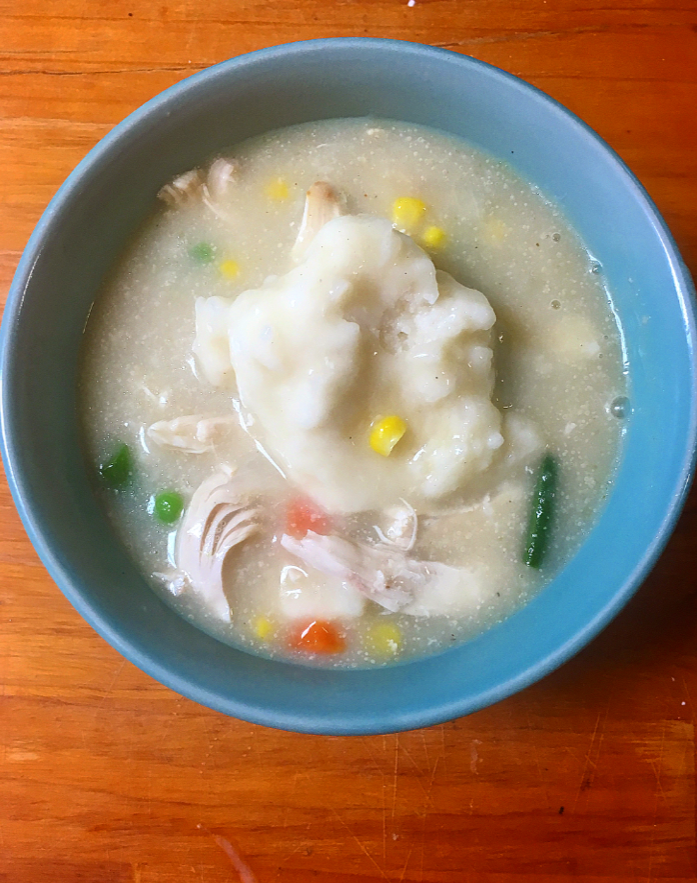
People love to say that things are “old family recipes”…but in this case, that’s actually true. My grandma grew up on a farm in North Carolina where she learned how to cook traditional Southern food. One of the recipes that kind of became her signature dish was her chicken and dumplings. She made it for my mom during her childhood and when my mom got older, she had grandma teach her how to make it. Once my mom had her own family, she would make it for us for special occasions. Both my dad and I requested it for every single birthday! It was and still is our absolute favorite meal!
My grandma taught me, my mom, my sisters, and my cousin how to make it. Thankfully, she also kept her hand-written recipe card for it in the house as well. After she passed away, my grandpa dug out the recipe and made it for himself when he was missing her 🙂 He said it wasn’t as good as when she made it, but it was “pretty darn close.” This dish has always been near and dear to my whole family because it was such a beloved part of our childhood…but now that my grandma has passed away, it’s become even more comforting and special 🙂