Since being diagnosed, deep dish pizza was really the only thing on my Celiac bucket list that I just couldn’t seem to find. Understandably I guess, since gluten is pretty key in that whole thick crust thing. But being raised in the Midwest, I was dying for some deep dish. I grew up on that delicious, caramelized crust that was every bit as tasty as the sauce and cheese and New England pizza just wasn’t doing it for me. All you can get around here is super thin crust that, to me, tastes like cardboard. Even before being diagnosed, I just wasn’t a fan of any of it. My husband is from the New Haven area, which is famous for it’s thin crust pizza, so we’ve had many debates about which crust is best! I just can’t understand why you’d want your crust to taste like cardboard when you could have it taste good…? Haha You can take the girl out of the Midwest, but not the Midwest out of the girl I guess.
Anyways, it was always on my to-do list to just go ahead and try to make it. As they say, if you want something done right, you gotta do it yourself. Well, as fate would have it, I was watching my favorite Food Network show–The Kitchen–and Jeff Mauro made a Detroit-Style pan pizza. I watched him make it and honestly it didn’t look too hard! I figured I’d just go ahead and give it a try. Some important things I learned from my experiment:
- I don’t know if it’s the gluten free flour or what, but my food processor could NOT handle making this dough. On the show, he just threw everything into the food processor, pressed pulse, and it formed into a little ball. Wanna know what mine did? It started smoking lol And it was the same type of food processor too! So now when I make the dough, I just make it in a bowl.
- You need a little bit more flour than his recipe calls for.
- Your dough isn’t going to rise as much as his does, but it’s all good.
So after living and learning, here is how I make it! I start by getting 3 cups of gluten-free all purpose flour into a bowl. Then I add in 2 tsp salt, 1 tsp sugar, and 1 tsp dry active yeast. Yeast is one of those things that I think people are sometimes confused about. As long as it’s not brewer’s yeast, it’s usually gluten free! The little packet I bought said “contains no wheat or gluten” right on it just to reassure people.
Mix up all your dry ingredients until they’re combined and then slowly add in 1 cup of warm water. At that point, I just put some olive oil on my hands and get in there. I mix it all by hand and then start kneading it. Keep folding and kneading it for about 10 minutes. I find this incredibly relaxing lol But I also love all things sensory–play dough, slime, etc. Once it’s nice and kneaded, plop it into an oiled bowl and put some plastic wrap over it. Find a spot in your kitchen that’s kind of warm and leave it there for a couple of hours. It should rise a little bit, but don’t expect anything crazy. Jeff’s doubled in size, but that’s just not gonna happen for us.

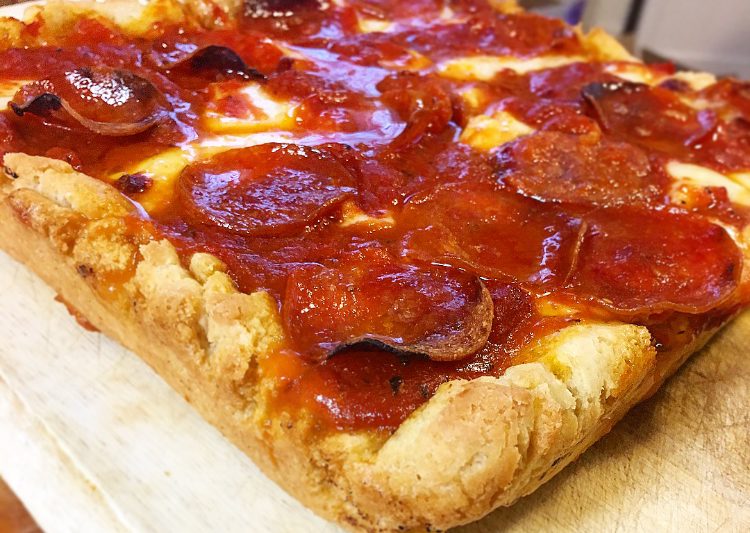
After a few hours, you should be good to go. Now it’s time to get it in the pan. The key to that caramelized crust is to cook the pizza on HIGH heat with LOTS of olive oil so it essentially fries. So preheat your oven to 500 degrees and drizzle a healthy amount of olive oil in an 8×8 pan.
 Make sure you spread the oil up onto the sides too. You want the sides of the crust to fry and get all crispy/caramelized as well!
Then you’re just going to press your dough into the pan. Spread it out evenly. I’ve done it where you make the middle thinner and do a more defined crust and also where the whole thing is the same thickness…both work just fine! So it’s really up to you.

I used quite a bit of olive oil so it kind of overflowed into the dough. Try not to let that happen haha But it’s not the end of the world if it does. Next, you’re going to add a layer of pepperoni and diced mozzarella cheese. That’s right, I said diced! The Detroit-style uses cubes of mozzarella cheese, but really whatever you want to do is fine. I’m sure shredded would be great as well!

At this point, you’re going to drizzle a few lines of pizza sauce. I just use jarred pizza sauce–typically the Classico kind. And then you can top the sauce with a little more pepperoni if you’d like….I say the more the better.


Now you’re just going to put it in the oven on the bottom rack for 10-20 minutes. It honestly depends on your oven. My pizza is usually perfect between 15-20 minutes, but your oven might work harder than mine, so just check on it!


Not too shabby, eh?? I was super satisfied and my husband couldn’t stop raving about it!! He’s asked me to make it several times again already! WIN.
Ingredients:
- Pizza Dough
- 3 cups all purpose gluten free flour
- 2 tsp salt
- 1 tsp sugar
- 1 tsp dry active yeast
- 1 cup warm water
- Toppings
- Jarred pizza sauce (about a cup, depending on your preference)
- Block of mozzarella cheese (you’ll use about 1/2 an 8oz block)
- Pepperoni (I use Hormel or Applegate)
- 3 tablespoons olive oil
Instructions
- Add flour, salt, sugar, and yeast to a bowl. Mix together.
- Pour in warm water. Put some olive oil on your hands and then begin to mix the dough together until it’s all incorporated and cohesive.
- Knead the dough for about 10 minutes.
- Place ball of dough in a bowl, cover with plastic wrap, and let sit in a warm spot in your kitchen for about 2 hours.
- Preheat oven to 500 degrees.
- Add olive oil to a metal 8×8 pan and then press dough into it, spreading evenly.
- Top with a layer of pepperoni.
- Add cubed pieces of mozzarella (about 1/2 inch cubes)
- Drizzle pizza sauce in lines down the pizza. 3-4 lines is usually good.
- Top with another layer of pepperoni (optional)
- Place on bottom rack in oven and bake for 10-20 minutes or until edges are brown and cheese is melted.
- Let cool and enjoy!!