People love to say that things are “old family recipes”…but in this case, that’s actually true. My grandma grew up on a farm in North Carolina where she learned how to cook traditional Southern food. One of the recipes that kind of became her signature dish was her chicken and dumplings. She made it for my mom during her childhood and when my mom got older, she had grandma teach her how to make it. Once my mom had her own family, she would make it for us for special occasions. Both my dad and I requested it for every single birthday! It was and still is our absolute favorite meal!
My grandma taught me, my mom, my sisters, and my cousin how to make it. Thankfully, she also kept her hand-written recipe card for it in the house as well. After she passed away, my grandpa dug out the recipe and made it for himself when he was missing her 🙂 He said it wasn’t as good as when she made it, but it was “pretty darn close.” This dish has always been near and dear to my whole family because it was such a beloved part of our childhood…but now that my grandma has passed away, it’s become even more comforting and special 🙂
When my grandmother originally starting making chicken and dumplings, she would make her dumpling dough from scratch. But when Bisquick came out, she just started using that and never turned back! So that’s exactly what I do when I make it too. Thankfully, Bisquick has gluten-free Bisquick which makes the whole process a piece of cake! It’s one of the easiest recipes to tweak to make gluten free and no one can tell the difference!

So I start the whole process off by putting 2 bone-in chicken breasts into a big pot and covering them with water! The water should fill about half the pot. I also dice up one onion into big chunks and throw that in as well. I add about a tsp of salt and then get it boiling. I let it boil for about 20-30 minutes, until the chicken is cooked all the way through.
Once the chicken is cooked, I use tongs to take it out and set it on a plate and set it aside to cool. At this point, I start working on my dumplings. I pour the whole box of bisquick into a bowl (I like a lot of dumplings) and add about 1 cup of milk (I use almond milk and it comes out exactly the same, but feel free to use whatever milk you want). Truthfully I just keep pouring in a little at a time until it has the consistency I want. You’re looking for it to look like this:

It shouldn’t be thin like pancake mix, but it should still be sticky. Kind of like the consistency of mashed potatoes. Be VERY careful not to over mix the dough!! If you mix it too much, it’ll give you really chewy, dense dumplings instead of fluffy ones. Try to mix it until the Bisquick is JUST incorporated.
Once the dumplings are mixed up I put about a cup of milk (I use almond milk) into a bowl and whisk in 2 tablespoons of cornstarch (my grandmother used flour…you could always use gluten free flour!). Once the cornstarch is fully incorporated, I pour the mixture into the water/broth and onion pot. This gives it that thick, almost gravy-like consistency…which really fools you into thinking it’s way more indulgent than it is! Once it’s done, it tastes like you used tons of cream and butter 🙂 Not saying it’s healthy…but it could be worse lol I also add about a cup of chicken or vegetable stock to the pot (so there’s more liquid) and about a tsp of poultry seasoning to beef up the chicken flavor (…lol).


Once I’ve poured the milk/cornstarch slurry in, I turn the heat down to low-medium. Then it’s time to add the dumplings! 😀 In traditional Southern dumplings (or at least in my family’s opinion), you “drop” the dumplings instead of rolling them. Since our dumplings are looser than, say, a biscuit recipe, we just scoop a spoonful of dough up and drop it into the broth. I usually do my dumplings about the size of a golf ball…but sometimes I get carried away lol just eyeball it. Scoop it up with your spoon and slide it off into the pot using your finger.


Once you’ve dropped all your dumplings into the pot, set a timer for 10 minutes and let the whole mixture cook on that low to medium setting with the cover OFF. While this cooks, it’s usually a good time to pull the meat off of our chicken since it’s had time to cool. Just use two forks to pull the meat off of the bone and into bite sized pieces. If your chicken happens to be really cooled off, you can always use your hands 🙂
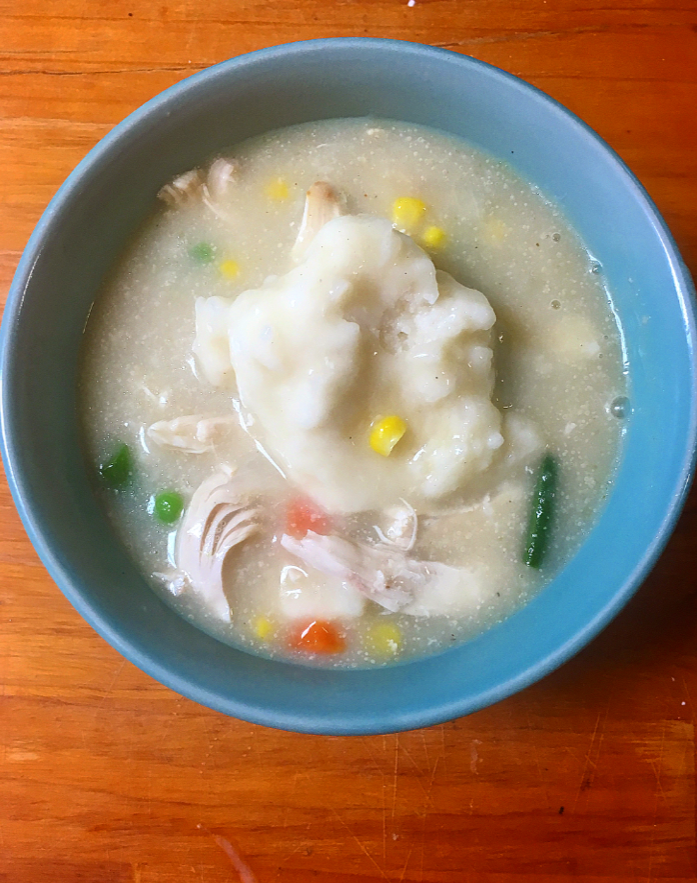
After the dumplings cook for 10 minutes with the lid off, I drop in a bag of frozen mixed vegetables. This was NOT a part of my grandma’s recipe…but I gotta get my veggies in somehow. And I actually love how the sweet corn in the mixed veggies compliments the dish! Once the veggies are in, put the lid on the pot and cook for another 10 minutes. When there’s about 2 minutes left, I add the chicken into the pot so it can warm up.
Once the 10 minutes is up, just check it to make sure it has enough salt/pepper and you’re done! Enjoy!


Recipe
- 1 box of gluten-free Bisquick
- 2 bone-in chicken breasts
- 2 cups of milk (your choice, I used almond milk
- 1 tbs cornstarch
- 1 onion
- 1 bag of frozen mixed vegetables
- 1 cup of vegetable or chicken broth (make sure it says gluten free)
- 1 tsp of salt
- 1 tsp poultry seasoning
Instructions:
- Put your chicken breasts in a large pot. Dice your onion into 4 large chunks and add to pot as well. Fill pot half way with water (enough to cover chicken). Bring to a boil and let boil for 20-30 minutes, or until chicken breasts are fully cooked.
- Remove cooked chicken breasts from pot and set them aside on a plate to cool.
- Make your dumpling dough by dumping the full gluten-free Bisquick mix into a large bowl. Add in 1 cup of milk of your choice slowly, mixing it in as you do this. You want the texture of mashed potatoes, so if you need more or less milk, do that. Adding in milk until mixture is JUST combined and you reach the desired texture.
- In a smaller, separate bowl, add in 1 cup of milk of your choice and 2 tbs of cornstarch. Whisk it together. Once all the cornstarch is mixed in, pour it into your pot and turn the heat down to low-medium. Add in cup of vegetable or chicken broth and 1 tsp poultry seasoning.
- Drop your dumplings into the pot one by one–scoop about a golf ball size of dough onto your spoon and use your finger to push the dough off of the spoon into the pot. Do this until all of your dough is used up.
- Cook with the lid off for 10 minutes.
- Use two forks to pull all the meat off your chicken breasts.
- After 10 minutes is up, add in bag of frozen mixed vegetables. Put lid on and cook for another 10 minutes, adding your pulled chicken in when you have about 2 minutes left on the timer.
- Season to taste and enjoy!